Banner detail
The elephant has attracted a lot of attention, which isn't doing my ego any harm, though I may need to get a builder in to have the doors widened to accommodate my swelling cranium!
Yesterday Wolfgang asked me how I make my Sassanid banners. To be honest, it hadn't even occurred to me that I was doing anything that might need explaining, but now that I think about it, it isn't all that simple unless you do a lot of model-making.
Starting with the last bit first - i.e. the flag - I just follow the instructions that come with the sheets of LBMS banners. The important things to remember are to use decent paper and to work in a clean space, so you don't get specks of dirt involved in the process. I actually prefer to put the transfer onto a piece of paper that has a coat of white acrylic paint on both sides - I think they stick better and the paint makes the paper more opaque so whatever painting you do on the back doesn't affect the appearance of the design on the front.
Right, having got the fancy-looking bit out of the way, it's onto the boring, but essential bit: the 'stick'. The fancy twiddly bit for the top comes from the figure manufacturer. Often they have a white-metal 'stick' protruding from underneath - if so, hack it off with a sharp scalpel and drill a 1.1 mm diameter hole into the casting from underneath, being careful to drill 'vertically' - i.e. so the casting won't look 'drunken' on the pole. I've been drilling by hand for many, many years, and am very good at judging right-angles and things. It isn't, I suppose, all that easy really!
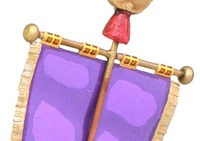
Then you need some 1mm diameter brass wire. Let's go for a big banner, like the big purple one on LBMS's Sassanid banner sheet (available from this link). You need two pieces of wire, one 60mm long, the other 36mm long. Now I have to admit to having some skills which are slightly unusual (for a wargamer). If I'm joining two bits if brass wire, I always solder them together - the joint is strong and permanent, way, way better than using superglue or epoxy. I file a 'nick' in both wires, just where I want the joint, place them on a board at 90º to each other, and solder them. No fuss, no mess. And then I check that they are at 90º. I rarely need to adjust them - years of practice I suppose. Once that's had time to cool (OUCH!), I wash it in hot soapy water to remove the soldering flux.
The last job is to superglue a couple of little beads on the ends of the cross-pieces and the fancy symbol thing in place on the top. Our local market has a haberdashery stall, which sells all sorts of useful stuff - including tubes full of tiny, tiny beads, which have very conveniently sized holes.
And that is that, apart from painting the thing and finally gluing the flag in place.
One last wrinkle which Brian Phillips suggested (for a real treat, have a look at his web-site - his Sassanids are here), is to glue tiny 'gems' (also available from a decent haberdasher) onto the flags - I haven't tried it yet, but they need to be attached last - after matt varnishing and everything!
I've started work on four A&A Miniatures Roman Scorpiones - one for each of my planned legionary cohorts. I'm putting them on round sabot bases, as I did for my early Imperial Roman ones - see my old blog here. The figures are based on my usual UK 'new' pennies, with the scorpione models on 25mm 'repair washers'. The sabot bases are made from thin plywood, cut out with an Olfa 'compass cutter' - but I'd forgotten how hard on the fingers the compass cutter is, so I've got a big blister on my index finger. This is rather sore, and has brought progress to a screeching halt - before I've finished cutting the circular holes in the upper half of the bases.